
If you're stuck with a Belkin WeMo where you had unfortunately upgraded the firmware, alas, the only way I've found to get OpenWRT running on it is to break out the soldering iron. Unless another vulnerability is found... If you're running firmware version WeMo_WW_2.00.2176.PVT or lower, check out The Easy Way.
The OpenWRT site has a great photo with a teardown of the WeMo, including the location of the serial port pads.
Soldering tips
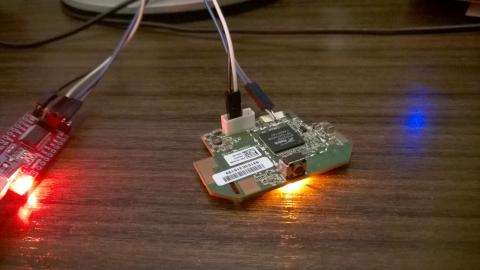
The pads are only 1.27mm apart, and very difficult to solder bare wires to if you're not an experienced solderer. If you're an Arduino fan, you likely have some Dupont cable lying around. Take a pair, and swap them into a 2P housing. Arduino uses a pin spacing of 2.54mm – the pin spacing we need is 1.27mm. Use a pair of pliers to bend and straighten the ends to the correct spacing. Use your soldering iron to heat the pins to attract enough solder, then simply drop the pins & housing into place. You can see from the photo, I used a bit of Post-It Note to prevent contact with the lower two pins.
If you're using a typical USB-to-Serial adapter like the FTDI232, you can actually power the board off the VCC+GND pins from the adapter (set the voltage selector to 5V).
Setting up
U-Boot's loadb command allows us to download an image over serial to memory, using an ancient file transfer protocol called Kermit. On Linux, the client you want is C-Kermit. Apparently Kermit clients on Windows exist (e.g. Kermit 95), but I couldn't get Kermit 95 to work under 64-bit Windows 7.
If you're using Debian or Ubuntu, you can grab C-Kermit with apt-get install ckermit
Put the following in your ~/.kermrc:
set line /dev/ttyUSB0   # Amend to your own serial port, e.g. /dev/ttyS0
set speed 57600
set carrier-watch off
set handshake none
set flow-control none
robust
set file type bin
set file name lit
set rec pack 1000
set send pack 1000
set window 5
Fire up C-Kermit and connect to the serial port:
$ kermit
C-Kermit> connect
If you're having permissions issues, you probably need to add your user to the dialout group.
Getting into U-Boot
The bootdelay (i.e. the time U-Boot waits for input before attempting to boot the default firmware) is only 1 second. It's pretty hard to catch on first boot, particularly if you're powering off the FTDI232. Hold down the Reset button on the top while applying power for around 5 seconds. Your Serial terminal will show it booting into the WeMo firmware, and starting to erase its settings. After the settings are erased, the WeMo will automatically reboot - start mashing the "4" key to get into U-Boot.
Custom U-Boot: Belkin Fail
Unsurprisingly, Belkin's customisations to U-Boot has a few bugs, making our job a little more difficult:
- erase linux appears to erase both the "A" and "B" firmwares
- cp.linux doesn't allow you to specify a length – it's auto-set; but only by tftpboot (not by loadb)
- The cp.b command is missing
The end result is we can't write our OpenWRT image straight to flash like we normally should be able to; and you'll also lose any trace of the original Belkin firmware. What a pity.
Also note, the WeMo firmware has its kernel commandline hardcoded so you can't simply add init=/bin/sh to bootargs to get a root shell.
We get around these limitations by loading an OpenWRT image with an initramfs, booting it into failsafe mode; then flashing the real firmware we want.
Grab the images
We'll need two images for this to work: one initramfs to boot into, in order to flash the real image we want to end up with.
Grab these two images to your local machine:
- openwrt-15.05-ramips-rt305x-belkinf7c027-initramfs-uImage.bin
- openwrt-15.05-ramips-rt305x-belkinf7c027-squashfs-sysupgrade.bin
We'll use the same customised image from the earlier article, OpenWRT on a Belkin WeMo - The Easy Way as our final image. Check out the article if you're interested in what's changed from upstream.
Crunch time
This may or may not be required. I haven't tested what happens if you don't. sysupgrade under OpenWRT will "probably" do the right thing, and erase the right areas -- and will probably even leave the "B" partition unharmed.
RT5350# erase linux
Set up the boot variables in anticipation of our real OpenWRT image:
RT5350# setenv bootstate 0
RT5350# setenv check_boot 0
RT5350# saveenv
Loading an initramfs image to RAM
By default, loadb downloads the image to 0x80100000.
The OpenWRT kernel starts unpacking itself at 0x80000000 - just 1MB lower (the kernel is probably around 3MB). So we need to pick a different memory region to download to. I chose 0x550000.
RT5350# loadb 0x550000
## Ready for binary (kermit) download to 0x00550000 at 57600 bps...
At the prompt, bail out to the C-Kermit shell with CTRL+\ CTRL+C, then transmit the initramfs image:
C-Kermit> send /path/to/openwrt-15.05-ramips-rt305x-belkinf7c027-initramfs-uImage.bin
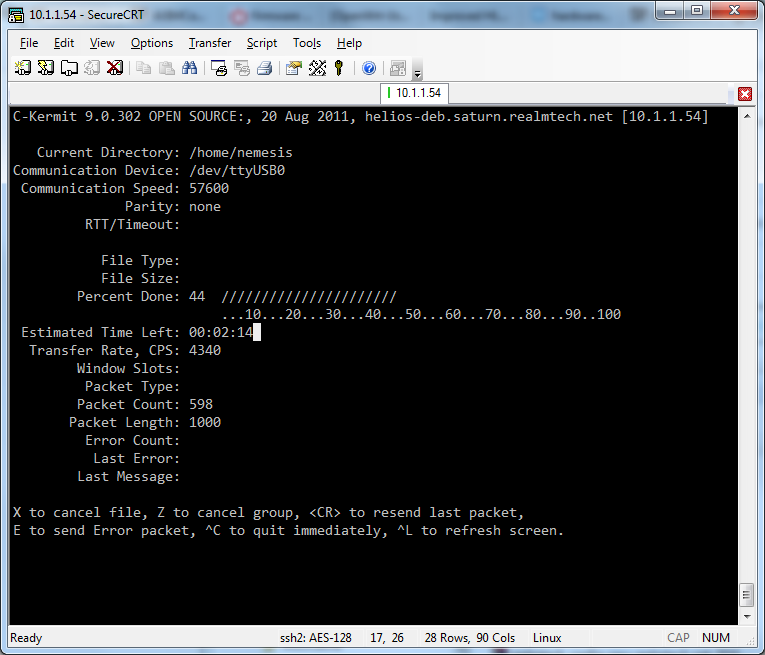
You'll see some pretty visuals of the image uploading. It'll take around 15 minutes at 57,600bps. Go make a coffee. When it's done, return back to U-Boot; and boot the image:
C-Kermit> connect
RT5350# bootm 0x00550000
Flashing our real firmware
If all went well, you should see the Linux kernel booting. After about a second, you'll see the failsafe prompt:
Press the [f] key and hit [enter] to enter failsafe mode
...do as instructed. After the screen has settled down a bit, press [enter] to get a console. You should now have a root shell.
Enable wifi:
# uci set wireless.@wifi-device[0].disabled=0
Breathe a sigh of relief - from this point onwards, no more serial comms are required!
Connect to the temporary AP, then telnet to 192.168.1.1 and set a root password.
SCP your local openwrt-15.05-ramips-rt305x-belkinf7c027-squashfs-sysupgrade.bin to /tmp. If you're using WinSCP, you'll need to select the "SCP" file protocol (not "SFTP").
And finally, write the real image to flash:
# sysupgrade /tmp/openwrt-15.05-ramips-rt305x-belkinf7c027-squashfs-sysupgrade.bin
And finally, reboot. With any luck, you should see the kernel booting, and a "WeMoWRT1604" Access Point show up!
- Log in to post comments
Comments
The (moderately) easy way
There is another exploit available that makes changing firmware somewhat easier for recent versions. It works for firmware up to 10884 or 10885, depending on the device.
Quick instructions:
Use the exploit code here to obtain a shell on the device. You'll need root.sh, getinfo.py, storerules.py, exploit.db and python installed.
To flash the new firmware:
# cd /tmp# wget http://www.realmtech.net/files/WeMo/openwrt-15.05-ramips-rt305x-belkinf7c027-squashfs-sysupgrade.bin# mtd write openwrt-15.05-ramips-rt305x-belkinf7c027-squashfs-sysupgrade.bin Firmware_1# fw_setenv bootstate 0# fw_setenv check_boot 1# rebootAnd then if successful, make it permanent with:
# fw_setenv check_boot 0STA mode
Hello, just recently flashed two Wemo devices, and everything went well. My question to you - How do you have your devices set up to connect to your home network? I tried following the general instructions on the openwrt site for client mode, however I'm not having much success. Any input? Thanks!
Josh
STA mode
Got it all figured out; you need to manually download and install the relayd and luci-proto-relay packages, as the sysupgrade bin doesn't come with these by default. I set everything up via the command line, however after these two packages are installed, I'm pretty sure you can configure via the web interface easily as well.
Wireless missing
I was inspired by your blog. So I bought a WeMo used. It came with firmware WeMo_WW_2.00.10885.PVT-OWRT-SNS. In terms of reflashing it, I got as far as booting the initramfs image. However, now there's no wifi:
This is at the end of the dmesg output:
Is there a way to load the sysupgrade firmware without wifi? If I did, would it find the wifi?
Wireless working with initramfs
I copied 18.06.1 instead for the initramfs. Now I am able to connect.
http://downloads.openwrt.org/releases/18.06.1/targets/ramips/rt305x/openwrt-18.06.1-ramips-rt305x-f7c027-initramfs-kernel.bin
Button configuration
I installed http://downloads.openwrt.org/releases/18.06.1/targets/ramips/rt305x/openwrt-18.06.1-ramips-rt305x-f7c027-squashfs-sysupgrade.bin. I had to connect to it in AP mode. From there it was easy to access the web interface to switch it to STA mode (luci was preinstalled).
How do I setup the leds, relay, and buttons?
Re: Button configuration
I figured it out. The script /etc/rc.button/rfkill is run whenever the power button is pressed. The relay can be turned on/off by echoing 0/255 into /sys/class/leds/f7c027\:device\:relay/brightness.
Here are the scripts I'm using:
root@OpenWrt:~# cat /etc/rc.button/rfkill #!/bin/sh # This button turns the relay on and off, not the wifi [ "${ACTION}" = "released" -o -n "${TYPE}" ] || exit 0 . /lib/functions.sh /bin/set_power.sh toggle root@OpenWrt:~# cat /bin/set_power.sh #!/bin/sh if [ "$1" = "on" ]; then new_brightness=255 elif [ "$1" = "off" ]; then new_brightness=0 elif [ "$1" = "toggle" ]; then read current_brightness </sys/class/leds/f7c027\:device\:relay/brightness if [ "$current_brightness" -eq 0 ]; then new_brightness=255 else new_brightness=0 fi else echo "Usage $0: <on|off|toggle>" >&2 exit 1 fi echo "$new_brightness" >/sys/class/leds/f7c027\:blue\:power/brightness echo "$new_brightness" >/sys/class/leds/f7c027\:device\:relay/brightnessVirtual Hi-Fiver
Kick ass! You sir are a gentleman and a scholar. I just installed this on the in-wall switch model f7c030 wemo without issues more or less. For whatever reason, the wifi occasionally didn't want to show up after flashing, even with the 18.06 initramfs. I ended flashing the 15.05 and then dirty flashing the 18.06 over it else the wifi was mia. All working good now need to get a rest auth endpoint setup for remote control...
json rpc via luci
Sounds easy enough - https://f-o.org.uk/2017/managing-openwrt-remotely-with-curl.html
Thanks, just one more step, Commit and reload
need to commit and reload